Hasan Tuna Erdem
Aren Canel
Mehmet Dogukan Uysal
Atakan Cura
İbrahim Furkan Özdemir
Introduction
-What is your project?
Our project was to model Bosch Universal Chain 18 Electric Chainsaw.
-What is it used for?
It is used for cutting wood with a diameter up to 135 mm.
-How does it operate?
It has an electric motor with a helical gear at the end of it. With the power coming from the motor the helical gear rotates another gear (Main Gear) inside of the chainsaw which has a shaft going through it. The shaft connects to another gear which the chain sits on. With the rotation coming from the last gear our chain slides and rotates on top of blades. The chain has extra features like automatic oiling of the chainsaw and a SDS system which allows the user to adjust the tension of the chain without using any tools. The shaft going through the main gear has threads at the back side of it and it rotates the gear on top of the oil mechanism. As we talked about in our presentation too there is a helical gap under the gear. With the help of a driver the gear tracks that helical path and as it turns it lifts up and down periodically. When it lifts up the shaft of oil mechanisms gear opens a gap for oil to pass through. With a tube oil is transferred to the chain. SDS systems main part is a cylinder with a helical path on the lower part and a gear like shape on the upper part. Helical path lets it slide on the correct way when adjusting the tension on the chain by hand and the gear like part is where you turn it by your hands.
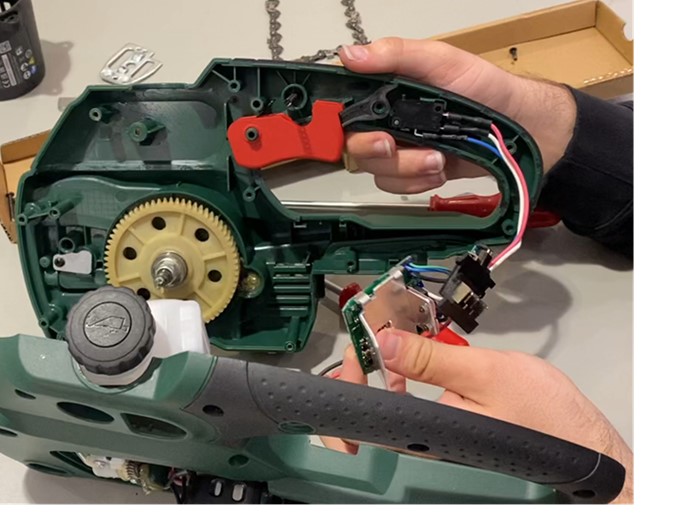
Disassembly
We took the dimensions with the help of a caliper, it was the only tool we needed to measure our parts. The challenges at the measurement process were due to some parts that we couldn’t separate like our chains and electric motor. We managed to disassemble the electric motor by applying great amounts of force to it but we couldn’t disassemble the chain. In addition to that, getting precise measurements for the gears was hard due to them being helical gears. We used raster images for the chain and the gears. On top of the raster image we put some points and we connected the points with lines and at the end of the process we resized them according to a known dimension of the parts.
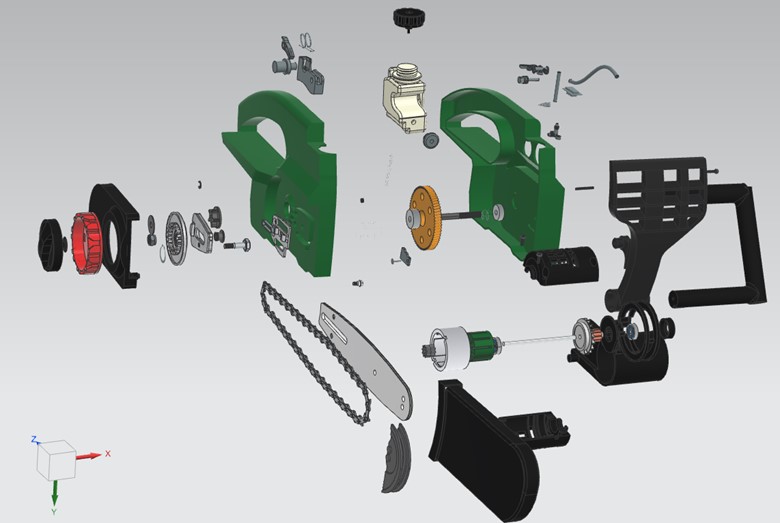
Exploded View
We classified our parts in eight sub-assemblies: electric motor, main gear system, the trigger, oil mechanism, blade, chain, outer shell, chain protection cap. Our chain consisted of five repeating parts but at chain assembly we had many parts.
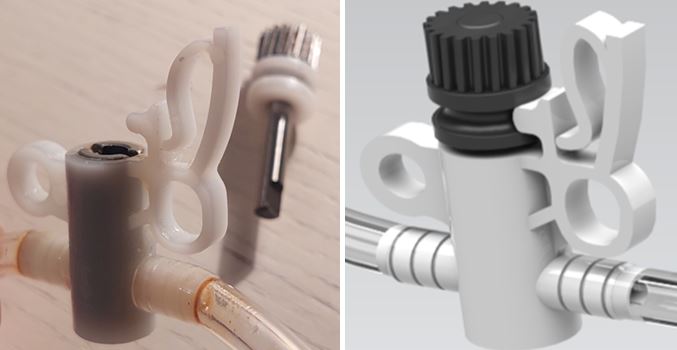
Part Comparisons and NX Commands
Since the cylindrical plastic needs to be filled with oil, I used the shell command on top of the cylinder. As you can see, two tubes are connected to the cylinder. I used extrude and chamfer to create the inlets through which these transparent tubes will pass through the cylinder. Since the shape contains many splines, it took me a long time to measure. One of the critical parts in the figure was the plastic T-shaped piece that contacts the helical part of the oil mechanism shaft. Since the shaft and the oil mechanism tube need to be joined precisely, we had to be careful when measuring it.
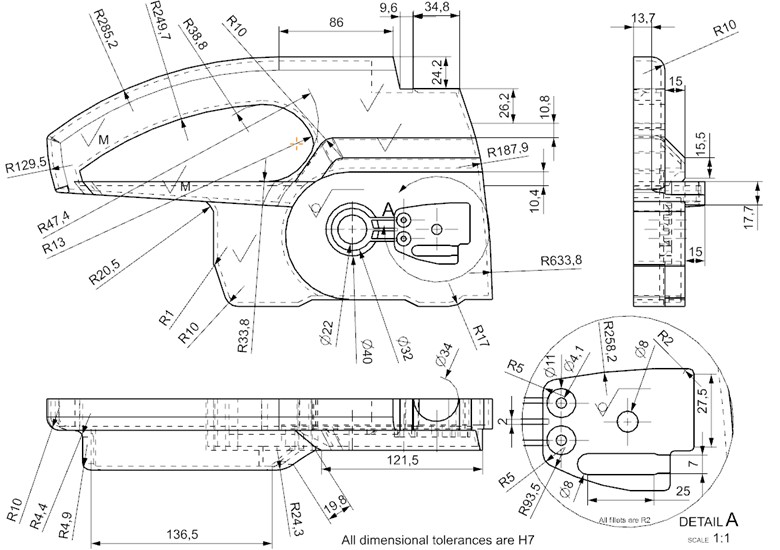
Drafting and Tolerances
In my part I used H7 for dimensional tolerances and I did not use shaft tolerances because there is no part that goes through a hole. All connections are provided by screws or other parts that have to fit on the casing. And I used some surface tolerances that have the multi directional lay for creating more grip between the chainsaw and the user’s hand. And I used the “material removal prohibited” symbol for some surfaces because these surfaces are important for the operation of the chainsaw and material removal will affect the efficiency and life of the parts of the blade. Other surfaces are free to be manufactured by any method.
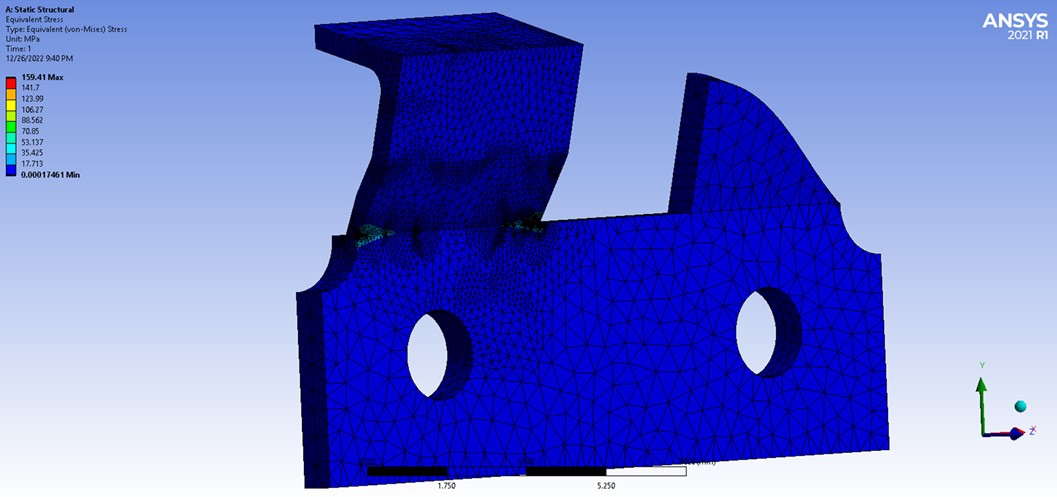
Finite Element Analysis
We conducted a structural analysis to see if the chainsaw is safe for cutting wood. It is important because human health and life shouldn’t be less significant than selling a product. We assigned stainless steel material for the chain and we fixed it from the pin holes. We applied 60 N of force which we calculated from the speed of our chain (4.5m/s) on the left side of the cutting part of the chain that can be seen from the picture below. From the results we can see that most of the stress accumulated at connecting parts of the teeth and the body of the chain and at max it was 160 MPa. The 160 MPa is below the yield stress of the stainless steel which is around 240MPa so we concluded that the chainsaw is safe to use.