TEAM MEMBERS
Mert Susuzlu
Hakan Soğukpınar
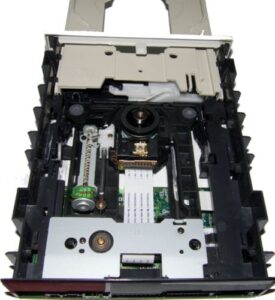
In this project, we analyzed, manufactured and experimented on ‘Compact Disk Ejection System’. For source, an actual CD-writer was used.
Timeline
We started with the examination of the actual CD-writer. After disassembling it, we examined the mechanisms that a Cd-writer consists. Later on, we made a prototype design and then started with the kinematic equations. According to our findings, we changed our design in order to function better. We choose our materials for the production with our reference design. The available production method was laser cutting, so we had to create the correct files for part by part manufacturing. After the manufacturing, electronic parts were bought and research on Arduino was made. Then we calculated the experimental data for our project. With a general perspective, we spent 2 weeks for the examination of the CD-writer and the prototype design, 1 week for the analytic equations and actual design, 3 weeks for manufacturing and experimental calculations. The project took 7 weeks in total if we add the delays that we had.
Theoretical Analysis
An actual CD-writer or reader has 3 main mechanisms. First one is a rack and gear system in order to move the tray back and forth. As the stationary gear rotates, free to move rack that is connected to the tray moves forward, after the desired position is reached, the gear turns in the opposite way to pull the tray back into the system. The second mechanism is the laser reader’s mechanism, which consists of a screw gear and the plate that can move on two steel rods (as rails). As the screw gear rotates clockwise and counter-clockwise, the reader goes back and forth. This motion takes place continuously while the tray is inside. The last mechanism is the one that rotates the cd, which consists of a single DC motor that rotates the CD continuously. For an easier approach, we replaced the screw gear system with two rack gear systems.
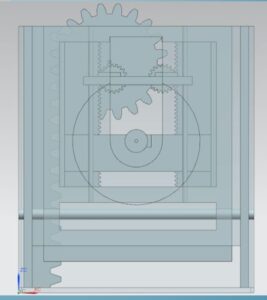
We started with the equations of the tray. The free body diagram we created with the prototype design is below.
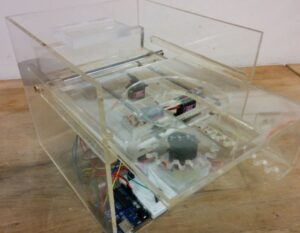
Manufacturing
After we made new changes according to theoretical data, we started manufacturing. Our main material was Plexiglas and we used the laser cutter in the machine shop to form it. After we had all the required parts, we started the assembly. When the main body was complete, we assembled the motors and started our first experiments.
,,